
Proving itself a reliable source of clean fuel, solar power has emerged as a genuine alternative for fast disappearing nonrenewable energy resources. Today a number of devices powered from solar energy have made their entry and have been successful. This is forcing the people of the current generation to accept it as a supplement for their energy demands.
So maintaining the same thrust, lets have a look at the process of structuring your own portable solar power plant.
Difficulty level
Designing your own portable solar power plant is not a very difficult task. If you know the steps and use your skills accordingly, you can have your solar plant ready. You can take the help of a carpenter for designing the wood frames for the accessories of your solar power plant to strengthen its portability.
Time required
Time required for structuring a portable solar power plant largely depends on the efficacy and skill of the person designing it but normally two-three days are enough for designing and structuring a fully functional solar power plant.
Resources required
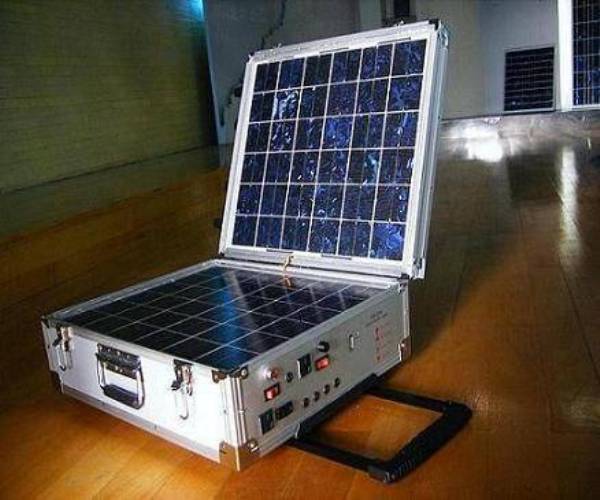
Before you start designing a portable solar power plant you must have the resources required for building it. It includes:
1. A solar panel
2. A 400 watt inverter and a 12 volt deep cycle battery
3. A tool box with auxiliary 12 volt plug and gauge wire
4. Heat shrink ring connectors and heat shrink tube
5. A SPST switch and a bridge rectifier.
6. A soldering iron.
Estimated cost
The estimated cost of a portable solar power plant made using the above listed items will cost around Rs10000 at standard prices. While the total estimate may fluctuate if different items are preferred.
Instructions
Following the below listed instructions one can easily make a portable solar power plant :
Step 1: Sketching the design
The first step of building a portable solar power plant is sketching the design of the solar power plant to be structured. It will be the base for the finally completed product. The quality of the sketch reflects the vision which largely impacts the product to be framed.
Step 2: Mounting the battery and wiring
The second important step in building a portable solar power plant is mounting the battery in the wooden box and carrying out the wiring which will help in charging the solar panel as well delivering the current to the connected devices. Fixing the battery into the wooden box will also provide safety to the battery and strengthen the portability of solar power plant.
Step 3: Installing the plug which will carry the power input
The next important step is the installation of the power plug which will carry the input current. For this purpose cut a hole in the in the utility box so that the connection end of the power plug faces the utility box.
Step 4: Preparing the wires and drilling holes for its passage
The next step includes preparation of the wires for connection to the circuit and drill of holes to facilitate its passage. For this purpose, holes should be cut under the utility box to allow the wires to reach the battery and complete the circuit. After drilling the holes, crimp the wires using a crimping tool and using a lighter shrink the tube on the ring connector. Do not allow the traffic of wires by stripping the long unneeded wires.
Step 5: Soldering
Run the wires joining the battery and circuit at the bottom of the utility box and put the heat shrink tubes on the connections to avoid short circuiting. Also do not forget to tighten the compressions which will provide safety in case the wires are subject to external disturbing forces. Also screw the lid of the utility box secure the solar power plant.
Step 6: Installing the power output plug and wiring for the inverter
Mount a 12 volt power output plug in the same way as the power input plug was fixed in the utility box. It will carry the output current. For wiring to the inverter drill holes and run two wires through it. Using the crimping tool crimp the small ring connectors to the inverter ends of the wire and fix large ring connectors to the battery ends.
Step 7: Finalizing the solar power plant
After completing the above steps plug it into a solar panel for charging it. Once it is charge it will harness the energy from the sun and will power your devices.
Frequently asked questions
In how much time the solar battery gets charged?
It will depend on the intensity of the sun light and quality of the solar cell used.
Is it necessary to use wooden box for designing the solar power plant?
No it is not necessary to use only wooden box. Any non-conductive and durable material can be used.
Quick tips
1. Always use high quality solar cell and wires in your solar plant.
2. Use durable materials for designing the box for your solar power plant.
3. Always ensure direct sun rays on the solar cell.
Things to watch out for
1. Always solder the connections to avoid short circuiting.
2. Don’t connect the devices with high energy requirement.
3. Disconnect the devices when they are full charged.
4. Don’t connect the devices when the solar power plant is not charged to an optimum level.