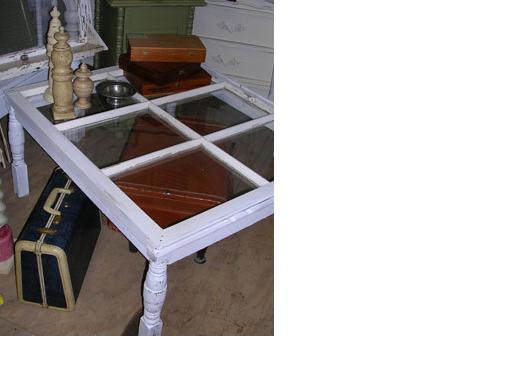
Converting an old window into a table can be quite simple and rewarding. A little imagination in making a table out of old wood can make wonders. Apart from making some functional items, old window frames can also be used to make decorative household items like art works and frames. All that is needed is some sanding and painting to the old wood to make it look new and appealing. You can also make it a weekend project for you and your kids. Tables made of old window frames can bring a retro or vintage look to your kitchen and drawing room. So, next time when you are changing your old windows with the latest models, remember not to throw out the old window frames. The steps in making a table using old windows are given below.

1. Gather all the tools necessary for this project. Most of the required tools like screw drivers, sand paper, saw, paint brush, etc. are available in any neighborhood hardware store.
2. The first step in making a table using old window panes is refurbishing the old wood. After the window is detached from the wall, the first thing you need to do is to remove any hardware like nuts and bolts from the window. This will help in preventing any accidental cuts to you when the table is being made.
3. After this, sand down the wood of the window frame from using a fine-grit sandpaper. Sanding will also help in removing old paint and smoothing out any bumps or dents in the wood. If the old wood has multiple layers of paint, a paint stripper is necessary to peel of the layers. Wipe the surface of the old wood with a damp cloth and let it dry for some time. Once the wood is totally dry, paint the window with varnish or your favorite color of paint using paint brush. It is better to paint a second coat to prevent the fragile old wood from damaging quickly.
4. When you are sanding the wood, do remember to cover the glass panes of the window frames with masking tape lest you may end up damaging the glass panes. The masking tape can be removed once the painting job is over. If you do not want to keep the glass panes of the old window, the other option is to replace the glass panes with medium density fiberboard (MDF). You can also increase the look of the table top by gluing mirrors or colorful tiles to the medium density fiberboard.
5. Once the table top is ready, the next step is preparing the legs of the table and attaching them to it. Attach mounting brackets to the four corners of the table top to connect the table top with the legs. The mounting brackets should be screwed to the table top using iron screws. Do not use nails to attach mounting brackets to the table top as it may damage the wood. The screws used should be small enough so that they do not come out from the other side of the table top.
6. Before preparing the legs for the table, decide on the height of your new table. This will ensure that the new table works well with the existing chairs in your home. Most of the tables used in kitchens and drawing rooms are 30 to 32 inches tall. You can also measure the height of the existing tables in your home to decide upon the height of your new table.
7. After determining the height of the new table, cut the legs to the stipulated length using a saw. Make sure all the legs are of even length. Sand, clean, and dry the legs using a sand paper and cloth just like it was done with the table top. Paint the legs with the paint color that matches the table top.
8. Once the legs are ready, they should be attached to the mounting brackets. Slide the legs into the mounting brackets and screw them tightly using iron screws. Now put the legs of the table on the floor and press down the table top. Make sure that the table is standing properly on the ground. If the table is swaying, check whether the mounting brackets and legs are attached properly.
Tables made using old windows can also help in keeping a bit of the old feel even to a new place. The process of making a table can consume time as the multiple paint coats need to dry well. A sunny weekend could be a perfect time to finish the project.