
Convection solar heater comes in handy and can be built easily in your home. Not only can this device be constructed economically at home, it will help to save up in the long run as well. Freely available solar energy is used to run the gadget, which will help to cut down your bills drastically. In this DIY instructable, information is provided to make such a passive solar heater yourself. But the heater built will not be very large. It can be used in your garage and can easily heat an area of 500 square foot. Of course, it will not be as effective as other solar heaters manufactured on the large scale, but it still delivers its function and keeps the area from getting too frosty. It can increase the temperature indoors by roughly 10 degrees.
Difficulty level
Easy, for first timers. Anyone can do it
Time required
2-3 days
Resources required
- Wooden sticks
- Plywood
- Plexiglas
- Soda cans
- Fan
- Black paint
- Drill
- Cutter
Instructions
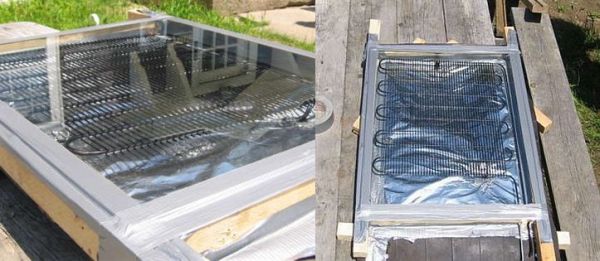
1. Start by making a wooden box. For this you will need plywood and wooden sticks. Make a frame out of the wooden sticks and then fit in the plywood. Fit the plywood on 5 of the six faces, not the side you are going to use as the front of the box.
2. On the front face of the box, you have to affix Plexiglas. This allows sun rays to pass through inside easily. As there is wooden cover on rest of the faces, they will be shut inside the box.
3. Drill two holes in the box, one on the top while the second one at the bottom. Next, mount the fan on the bottom hole.
4. Now secure the box tight from all sides. Close up all the seams with a nice all-weather caulk.
5. Pack in the insulation as you don’t want the heat harnessed to escape out. Pad the bottom or sides of the box with any insulation of your choice. Foil insulation is a good choice as it is non toxic, thin, and retains heat effectively.
6. Then bore about 1 inch holes on top as well as bottom surface of the cans.
7. Dip them in warm soapy water for thorough cleansing. Allow them to dry out for a day or two.
8. Paint them overall with black colored hue that absorbs heat readily. Make the cans air tight by lining the edges of the can with caulk.
9. Pile the cans on top of each other in neat rows inside the box.
10. Lastly, fasten the Plexiglas frame on the front face of the box. The passive solar heater is ready for use.
Frequently asked questions
1. How does this device actually work?
A. The sun rays easily enter the box through Plexiglas. Then the opaque wooden faces of the box prevent them from escaping out. Aluminum cans are affixed inside the box. These will heat up due to the sun rays that enter inside. Thus, solar convection energy will be generated by this equipment.
2. Why are the holes drilled inside the box?
A. The holes act as vents for the device. Through the top hole, the hot air that rises above will be let outside. While, the bottom hole will be an inlet for cool air. This will help to regulate the temperature of the box.
3. How is this device eco friendly?
A. Clean and green solar energy is used to operate this device. No harmful emissions are produced. To add to the eco-quotient, you can also use green insulation.
Quick tips
1. A bigger box will generate more heat and therefore can thaw out a larger area. So, if you are sure then you can also build a larger box to heat a more spacious room.
2. If you build a bigger box, then more number of cans will have to be fitted inside.
3. Use flat barbecue grille paint in black for the cans. This paint is cheaper, retains heat much better than other paints and also can withstand high temperatures without flaking or peeling.
Things to watch out for
1. Keep in mind the required size of the box to heat the room adequately. To heat a 400 square foot area, a cubical box measuring 4 feet on each side will be sufficient. Therefore, the length of the box should be in proportion with the area of the room.
2. Make sure that the cans you plan to fit inside the box can be affixed easily. Size them both before you begin building the apparatus.